PedigreeXP User Guide
Welcome to PedigreeXP! In this user guide you will find basic information on how to use the application.
PedigreeXP is an intuitive pedigree drawing and management tool, which helps you chart family health history and identify familial risks for disorders. It improves the recording and interpretation of pedigree data which reveal important genetic, cultural, behavioral, and environmental factors in health throughout an individual’s lifetime. PedigreeXP is aimed to support clinical geneticists, genetic counselors, genetic consultants, oncologists, organ specialists and all specialists working on genetics.
How to Create a Pedigree
Quick start a pedigree by filling in the “Start new pedigree” form: basic information and diagnosis of the Proband, the number of Proband’s brothers, sisters, or children. The gender must be filled in, but the other fields are optional and can be filled in later. Add a personalized title and family ID to help you organize your pedigree files.
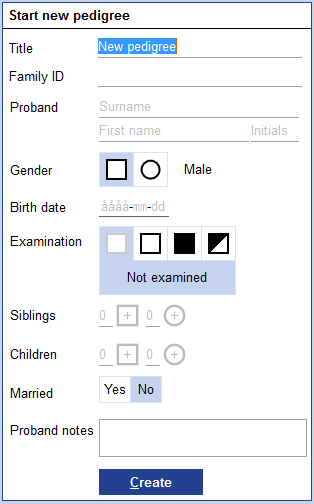
By clicking on Create, the initial family pedigree will be drawn automatically within seconds.
How to Set Pedigree Properties
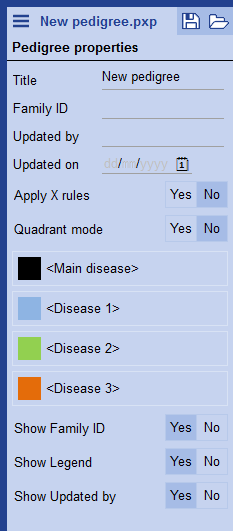
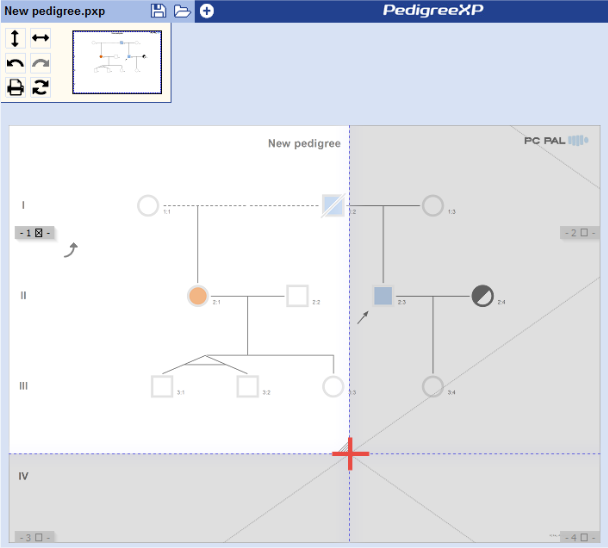
“Pedigree properties” can be set in a panel on the left side. Go to the file menu above the navigation window to open the panel. This is where you can change the settings and the display of the whole pedigree and create reports.
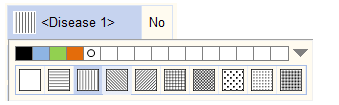
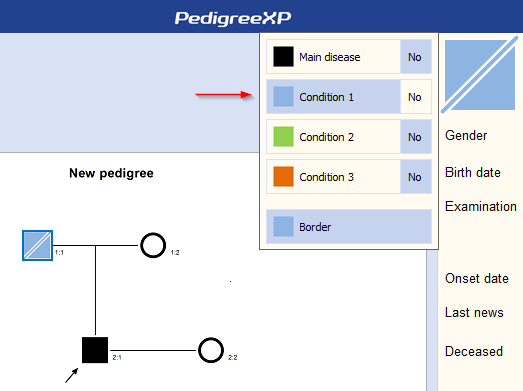
You can double click on the color of each disease to show a color palette. The color palette can be expanded by clicking the arrow. Next time you open the color selector, your recently used colors will appear in the color selector together with quick access to the different shades.
To edit the name of the disease, just double click on the text. Note that the main disease on the top of the selection box, is the main disease the pedigree studies and it defines the coloring of the affected status of each individual.
The different diseases or conditions can also be shown with shades. To choose a shade on top of another color, hold SHIFT + click on the color of the condition, continue clicking to go through the available shades. A quick selection for black and white shades (suitable for printing) can also be reached directly in the color selector described above.
How to Add More Data in the Pedigree
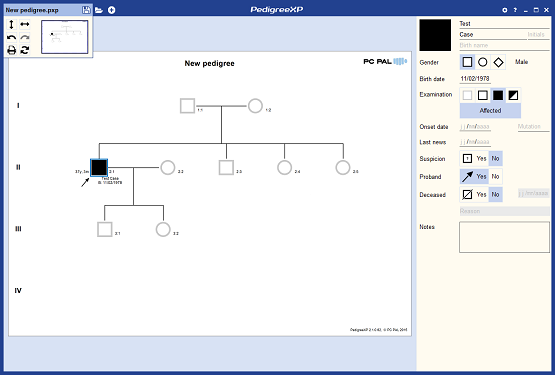
When an individual is selected, the edit panel is accessible on the right side of the pedigree page. The following data can then be entered and updated in the panel: name, initials, gender, birth date, diagnosis, onset date, last news date, mutation, suspicion of being affected, proband, deceased, deceased date and reason, additional notes. Notes can be added in rows and will be displayed underneath the person. Use Refresh and PedigreeXP will increase the distance between the generations if needed.
In the edit panel, the user can also assign colors or shades to denote another disease or condition.
How to Add Family Members in the Pedigree
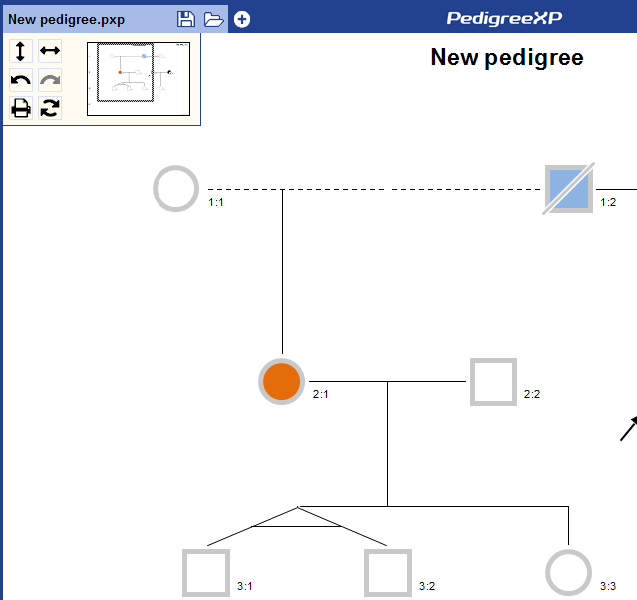
Once you have started a pedigree, you will be able to add more family members to complete the family history. To add a family member in the pedigree, simply click on an individual to whom you would like to add a relationship (relative): a box displaying different symbols will automatically appear. Click on the corresponding symbol (Child, daughter as in the example below) to add the family member. There is also the option to add Parents if applicable.
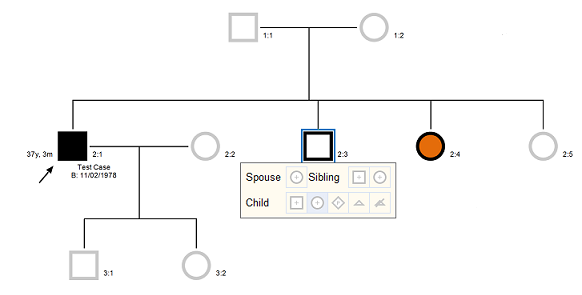
To create relationships such as Spouse, Twin or Triplet relation between two or more members in the tree, first click on one person in the tree and then use SHIFT + click to choose the other person. PedigreeXP will calculate the relationship based on the tree structure and give the user the available options in the pop up. Click on the corresponding symbol and the two people will be linked accordingly.
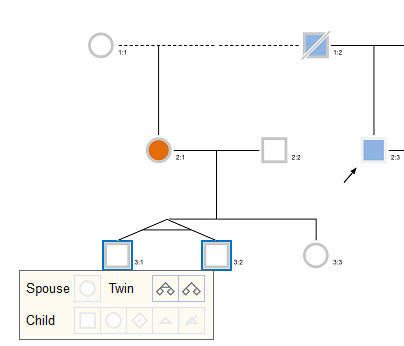
How to Create a Consanguineous Relationship or Change Relationship Type
Start by selecting two family members from the tree by SHIFT + click or multi-select with the mouse using click and drag. Both members selected are highlighted with a blue square. Point the mouse/cursor at one of the highlighted persons without clicking. A hint will open, click on the Spouse + option to connect them and a double line will be added.
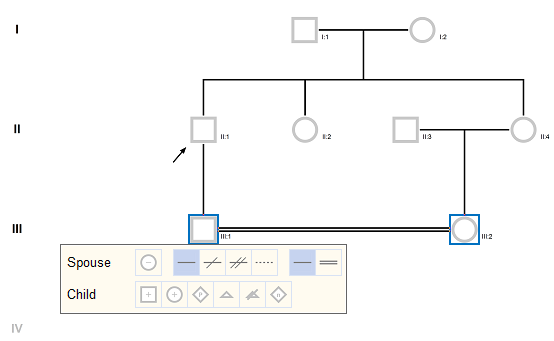
To manually change a relationship, choose one of the other relationship options that becomes available in the same pop-up as soon as two people have been selected as spouse.
How to Manually Rearrange the Pedigree
PedigreeXP will arrange family members according to birth dates if the information is available, but the pedigree can also be manually rearranged horizontally by drag and drop. The family members can either be moved one by one or in groups. Select multiple persons with SHIFT + click or select a part of the tree by selecting an area with the mouse.
It is also possible to find and select all family members closely related by holding CTRL and clicking the person of interest.
After manually rearranging, PedigreeXP will remember the arrangement. Using the auto arrange button will not disturb the originally created arrangement.
How to Assign Colors or Shades to Denote Another Disease or Condition
In PedigreeXP, you can choose distinct colors to denote a disease or condition other than the main disease of your pedigree. Simply click on the individual you would like to mark with a different condition, the panel on the right will be shown. Point the mouse over the symbol representing the individual, a selection box will appear for you to define the name and the color of the condition.
You can double click on the color of each disease to show a color palette. The color palette can be expanded by clicking the arrow. Next time you open the color selector, your recently used colors will appear in the color selector together with quick access to the different shades.
To edit the name of the disease, just double click on the text. Note that the main disease on the top of the selection box is the main disease the pedigree studies, and it defines the coloring of the Affected status of each individual.
The different diseases or conditions can also be shown with shades. To choose a shade on top of another color, hold SHIFT + click on the color of the condition, continue clicking to go through the available shades. A quick selection for black and white shades (suitable for printing) can also be reached directly in the color selector described above.
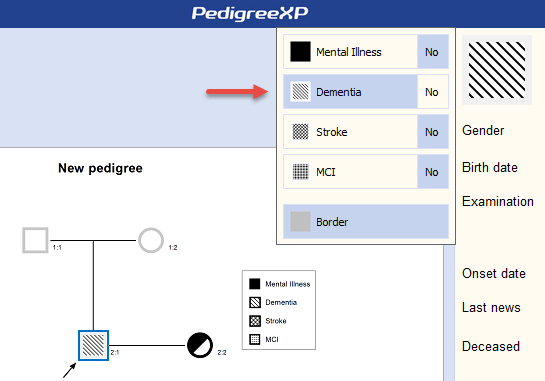
The legend is not shown by default but can be made visible from the properties panel described in more details below.
How to Assign Another Proband
The Proband marker can be assigned to another family member as needed. Click on an individual in the pedigree and set “Yes” to the Proband in the panel on the right side of the pedigree page. Two probands can be assigned at once.
What Data Entry are Shown in the Pedigree
Data entry information is added in the left panel.
Symbols
When a person is first added to the pedigree, their symbol is colored grey to show that there is no information available about the person, and that the person has not been examined for a disease. As more information is given about each person and the pedigree starts to build, the symbols and their color will change to reflect each person’s status in the pedigree. How to assign colors and add information is described in the “How to Assign Colors or Shades to Denote Another Disease or Condition” section.
Data Entry Information/Settings
From the upper right corner of the application window, when clicking the cogwheel, you can find the data entry settings. The settings are set from a dialogue where you can configure which information to display in the pedigree such as name, age, birth, death date, etc. You can also choose if the information should be displayed on the left or right side of the family members. Four different data entry alternatives can be displayed at once.
Use X-linked Transmission Pattern
If you are following an X-linked disease, PedigreeXP can help you automatically detect the possible carrier females. To do this, open the properties panel on the right side and select “yes” for X rules at the bottom of the dialogue.
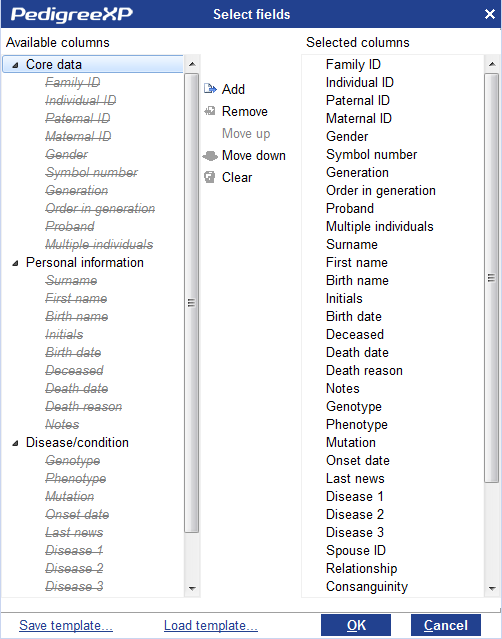
How to Create a Family Report
Generating a family report from a pedigree is quick, simple, and easily customizable. The report tool can be opened from the properties panel.
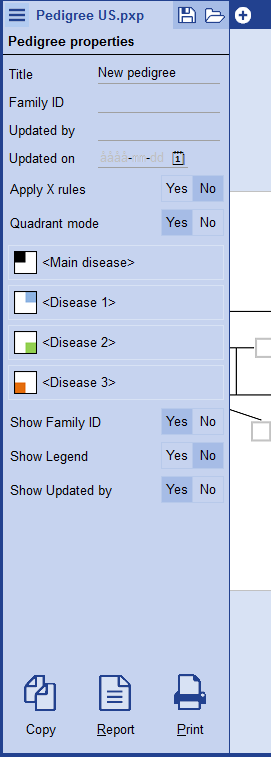
By clicking on the report icon, you will be directed to the report creation dialogue.
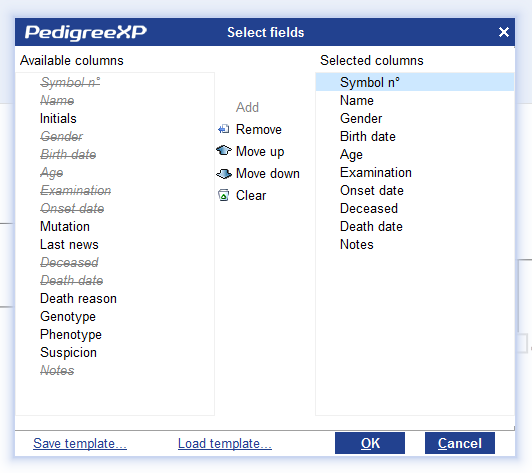
In the dialogue, you can choose which fields you would like to include in the report as well as the order of the fields. The core information will be pre-selected on the right side.
Thanks to the middle control buttons (Add, Remove, Move up, Move down and Clear), it is easy to select or deselect fields. Once all the fields are selected and prioritized, click OK to create the report.
Save Templates
Saving a report template for quicker access later can be done directly from the report dialogue. Select and prioritize the fields using the control buttons in the middle of the dialogue. When you are satisfied, click on the link “Save template”, choose a name, a file destination and save the template.
Load Templates
Loading a saved template is quick and easy: open the report creation dialogue as described above and use the link “Load template”, browse to find the file destination you chose when you saved the template and double click to load the template. Click OK to create the report using your template.
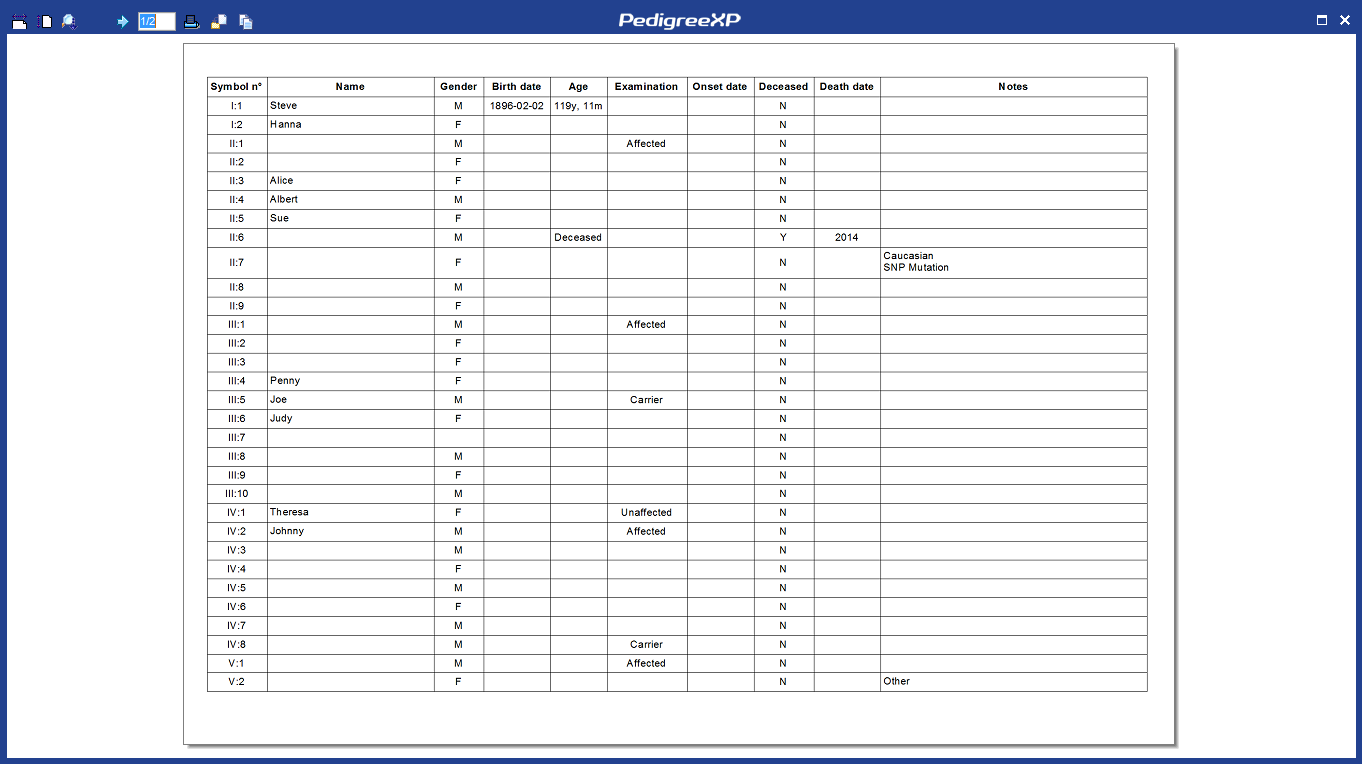
Using the report
The first pages of the report consist of a table created from the information chosen in the report creation dialogue and a picture of the pedigree drawing. The table generates more pages if needed and a picture of the pedigree always appears on the last page. Use the top left control panel to zoom, switch between pages, print, copy or save as PDF.
How to Print or Copy a Pedigree
Printing
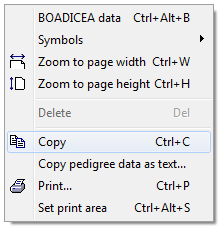
The print control can be reached by right clicking the pedigree drawing and by choosing the set print area. Once open, you can use the mouse to move the print area around and select or deselect pages by checking or unchecking the box on each page. Pages can also be switched from portrait to landscape layout if necessary.
Click on the print icon in the upper left section to print the pages of your choice.
It is also possible to print directly from the navigation window or from the properties panel, PedigreeXP will then optimize the printing area and print all pages.
Copy+Paste Your Pedigree
PedigreeXP also supports Copy to Paste the pedigree to other programs such as Microsoft Word or Microsoft Powerpoint.
When using Powerpoint, it is also possible to use the Microsoft Powerpoint “Ungroup” functionality to move the objects of the picture.
Copy+Paste into a Table
PedigreeXP allows the user to easily copy pedigree data into a table format. In the “right click menu”, choose Copy Delimited Text. The dialogue lets you include or exclude data from the table.
In the event of re-importing the exported data, the structure of the file should be respected.
How to Search and Find Members in a Created Pedigree
Navigation
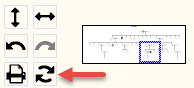
The navigation tool can be used to zoom in and out from the Pedigree quickly either by the control buttons, scrolling or by dragging the blue box inside the navigation window. Double clicking inside the navigation window will zoom out completely.
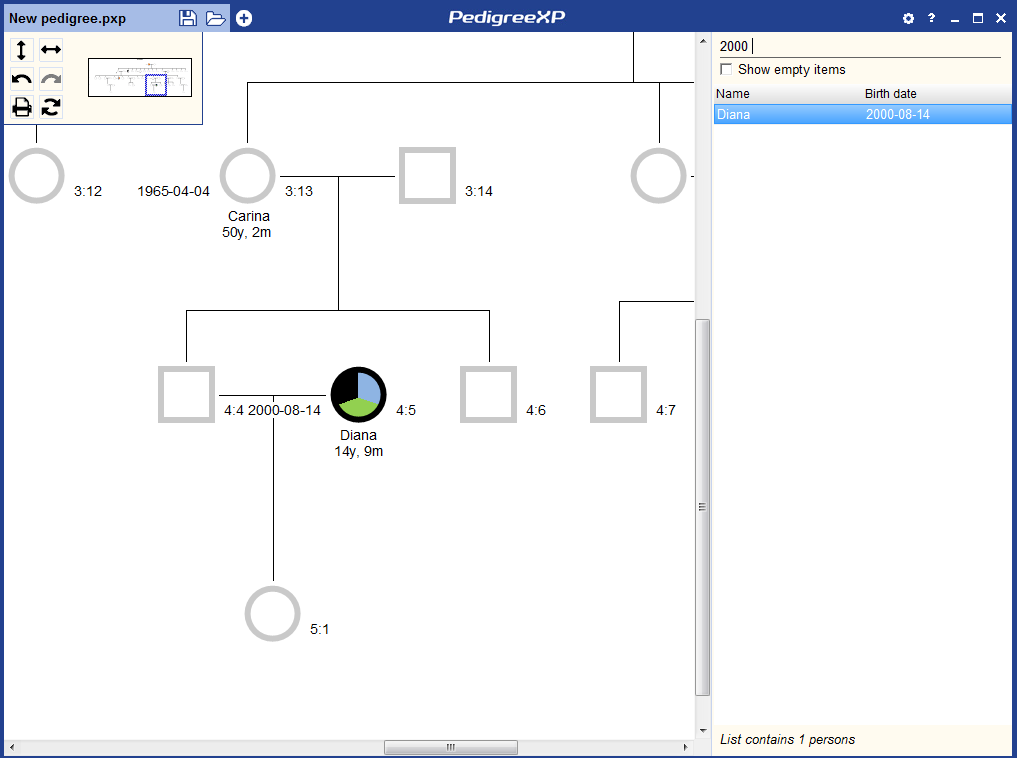
Search
In a large tree with many family members, a “Search” functionality is necessary. In PedigreeXP, the “Search” functionality can be found in the right panel. The right panel will appear when no family member is selected in the pedigree. The “Search” panel displays the search result with Name and Birth date. The “Search” functionality also allows to find family members in the current pedigree using all the following criteria: First name, Last name, Birth name, Birth date and the text in Notes. The search is instant and when double clicking on one in the list, the pedigree will find the family member and direct the view of the Pedigree to that person.
How to Import and Export Pedigree Data
Import
Pedigree Import is done easily by using “file open” from the PedigreeXP Menu. PedigreeXP can handle standard formats of PED, BOADICEA and GEDCOM as well as some versions of FAM files. We also use a tabular format suitable for editing information (e.g. using Microsoft Excel) called .ptxt which handles all the data fields.
Export
PedigreeXP export is simply done as a “Save as” functionality from the application. We can save as PED, BOADICEA and GEDCOM and we are limited only by the file formats themselves. For a complete export of all your data, it is possible to use the .ptxt tabular format as well as the binary PedigreeXP format .pxp.
PedigreeXP User Guide – version 2.1 (2.10.78) – 2015-06-15